Sunday, March 30, 2008

Lots of little steps

As you already know I am not going to get primer on until next Saturday.
(When I posted that I intended to go to work on Sunday, turns out I changed my mind and didn't go.)

It wouldn't have happened anyway.

The last coat of epoxy that I put on the deck didn't fully kick. It was almost there but still was sticky. I have had that experience before with polly making surfboards and the only solution I am aware of is to apply a hot coat over the top. (You can't sand it off or do anything else with it to my knowledge.)

With the epoxy I'm pretty sure you can't even do that. So I put it out in the hot sun for the morning and it hardened up as good as gold.
The reason for the slow set was because the hardener pump coughed when I was mixing the resin. I was aware that this happened but didn't think it would be bad enough to compromise the mix. I was wrong. And lucky.
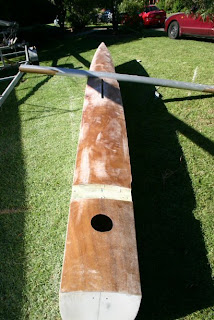


Oh by the way, my neighbour's son is now having his rest in the psych ward. He was transported there in the back of a police wagon. My way would have been a lot simpler. (I didn't call the cops, I only found out about it this morning).


Now, back to the jib...
The sail is totally dismantled now. I highly recommend doing this to anyone who is in the least bit interested in sailing. It doesn't matter if you are an aspiring sail maker or not.


Pulling a sail apart will serve two purposes.
It will increase your understanding of how they work.
And it will probably stop you whinging the next time you hand your cash to the sailmaker.
Even a small, simple sail like a jib contains an incredible amount of sewing.

I was going to re-cut my jib to suit the self tacking and I probably still will. Then I'll see how it turns out and order some laminate and make a new one. That way I'll get free experience on the sewing machine and with the sailcut software.
My old jibs are, after all, no use to me now so I may as well practice on them.
Maybe some people are different but with me, I can read all the books you want about something,(and I have) but I get so much more understanding from dismantling the thing to see how it works.
Maybe I'm just thick?

Also as mentioned earlier I reckon I have a bump in the foredeck of the starboard hull.
I've been looking at it and decided I won't take any action until I've seen it with a coat of white primer on it.
It's really difficult when you can see the plywood as your eye is immediately drawn to the line of the laminates. maybe with paint you won't even notice it. (And maybe, as I'm right on tolerance, the bump will cause the hull not to measure. Oh well, if that happens, Gordon and I will just have to hand the gold medal to the guys that come second.lol.)


Speaking of gold medals...
We are currently having our Olympic swimming trials.
Apparently, some chick took six seconds off her PB. (Must have been 1500m surely?)
If that happened in China or Europe the Australian media would be screaming "Drug cheat!".
At the moment we're just hearing what a good effort it was. (And I agree)
We're a pretty parochial lot us Aussies.

Saturday, March 29, 2008

Slow Progress

Well I've got the stripe off. It took the best part of two days (with a bit of an interruption which I will explain later).


Climate change, WMD, Terrorism.....nah, in my opinion the end of civilization will come about due to adhesive residue.

It is all pervading, insidious and evil. And I still have the other hull to go.


Scraping that damn stripe off with a razor blade and paint thinners.


I was progressing well with it yesterday until my neighbour's 38yr old son decided to have a psychotic episode and include me in it.

Same thing happened about a year ago when his parents were away on vacation. That time Lisa and I managed to convince him to take a ride to the hospital with us where he was sectioned and had a nice little rest in the psych ward.

Trouble was this time Lisa was at work and I'd had a couple of beers so I couldn't drive. Anyway I once again talked the guy into taking a ride. Tossed my keys to his father and said "Let's go".

In the car I said to the father "You know where we're going?"

He nodded conspiratorially and said yeah.

After driving around aimlessly for a while I said to him "You do know where we're going?"

He looked at me with a blank expression and said "No, where".

"The ****ing hospital!"

To which he said "Oh no I couldn't do that, it would be like a betrayal."

Shit!

May as well go home then.

We got home, the son is still on fire (He has schizophrenic episodes due to earlier drug abuse. During these times he is a danger to himself and others.)

I suggested the father come over to my house alone so we could discuss the situation. He did and I lit into him.

So much so that I had to ring him later and apologise.

I think it's a generational thing. His attitude is just "wake up to yourself, snap out of it and stop carrying on."

Stiff upper lip stuff. He will not accept that the only solution is medication.

You may think it's none of my business but actually it is. Not only are we Friends but the episodes a year ago involved him hassling my kids, which led to me threatening his health if he didn't stop and then ultimately to me and Lisa spending several of the early hours of the morning at the hospital with him.

As is always the case in these situations, when he takes his medication he is cool.

If any good can come from it its that I can look at my kids and realise how fortunate I am.

Anyway...........

That blew a hole in yesterdays schedule.


Consequently I've missed the painting window. We currently have really dewy evenings so it is best to get the paint on early in the morning. On dayshift this week so no mornings available 'til Saturday.

Looking for a way to spend a relaxing afternoon?
Here's what you need, in this order:
A six pack in the fridge.
Laptop plugged into your plasma screen playing youtube music videos (JJ Cale, REM, The Clash).
A de-stiching tool.
A sacrificial jib.
A packet of band aids. (try not to bleed on the sail.)

An exercise in learning sail construction.


Thursday, March 27, 2008

Filling & Sanding.

Actually that should say filling, sanding, sanding, sanding, sanding .

First photo shows screw holes filled, one hull trimmed-one not.


Here is the self tacking jib setup recomended by Harken:


Harken rigging page.
This is a pretty good facility. The diagrams have part numbers and if you click on them it brings up the a picture, specs and price.

This is the part of the project when the cost can run away unnoticed. I remember the last boat I built, walking out of he boat shop with a little box containing a couple of cleats, traveller car, bits and pieces, and being around six or seven hundred dollars lighter in the pocket.

I've been following these guys Builing F16s in Norway
I noticed a comment saying it is easier to keep motivated when doing a project like this in a group rather than solo.
This is probably true. Personally I find I have to keep at it at every opportunity to make it through the mundane, boring phases. It's all worth it when you hit the landmarks like assembly, painting, rigging etc.

This photo shows the worst job I have had to do so far. Removing the adhesive left from the stripe.


Trimming up the decks.

I am always protecting myself from epoxy. Now it looks like I have developed an allergy to latex gloves. Pretty sure it's ecsma (never suffered from it before) maybe from sweating in the latex gloves?


p>

Tuesday, March 25, 2008

Carbon Prices


Got prices from FGI:(Brookvale, Aus)
Plain weave 317gm 1.2m wide.....$60.90/m
Uni 450gm 330mm wide............$25.50

Add resin, regular glass, fittings and lock down mechanisms.......

Compared with Capricorn rudder stocks c/w hold down mechanism from AHPC.. $425/pr.

That's hard to beat and makes it difficult to rationalise building my own.

AHPC, or more correctly Goodall sails, are also making my trampoline.(As we speak)

Friday I pick up the primer for the hulls and hope to have a coat on by the end of the weekend.

As things stand Yellowtaxi will be hitting the water wearing her classic rig. I will probably have the new jib on but need to save a little for main and assy'. (I also figure there should be quite a few bargains floating around if not now, then after August)

We will see....
A carbon mast is also on the list but I will wait until we break the ally first.

Most of you will probably be interested in this blog:

Mcintosh-multihull

A multihull dedicated site in NZ with, amongst other things, some T action.

Monday, March 24, 2008

Decks are on.

What a harrowing experience that was.
"Have I remembered everything?"
"Are those chainplates OK?"
Etc etc.
Even found a spanner I'd left up between the subdecks.

Also each deck is a lot of work to complete within the pot life of the epoxy.

I have to tidy up/ fill a little around the centreboard slot as I went a touch off track with the router. Also the starboard hull has a bit of a bump in the front foredeck where I must have missed fairing in the first deck beam fully.

Both decks seem a little flat in the first 450mm or so from the stem. Just couldn't get the curve in the ply where it was so narrow. (I'll have to drag out the old decks as I don't really remember how curved they were originally.)

Next is trim up the decks then remove the adhesive stripe with a razor blade.

Fairing and priming. (Plus one more assemble before painting just to confirm that nothing needs to be packed, ground, etc for proper alignment.)

Hope to get onto FGI this week for a price on the carbon for the rudder stocks. Hopefully it is not too expensive. I am pretty keen to do them to get some more experience with carbon BUT I know I can get Capricorn rudder stocks for around $400 so I'll decide after I get the carbon price.

Another call will go to International paints to get the product code for the primer that goes over gel coat then I can order it.

Getting to this stage which is near the end, is making me realise how big a job it was. It has been made more difficult because of the small space I have to work in. A nice big industrial unit would have been good but what you've got is what you've got I suppose.


Four layers of six ounce on the sides, two on the subdeck.

Friday, March 21, 2008

Why didn't someone stop me?

After having everything pretty well aligned I got it into my head to improve it a little.
Totally screwed it up and it took the best part of four hours to get it back where it was!
Now I have 5mm difference on the diagonals (Over 6000mm I'm happy with that as a tollerance), hulls are parallel and on the same horizontal plane.


Finally found a use for the complete works of William Shakespear.


As the photos show, I have recieved the jib track. A really nice piece of gear too.(My wife thinks I need to get a life, being excited over a curved piece of aluminium. I was telling her how sexy it was, even said she could hold it if she wanted, but she wasn't interested. I dunno, go figure.).
Still considering mounting options. If it is rigidly mounted I will obviously have to wait for the new jib. I have heard that the track should be allowed to pivot up and down.
Any advice?


I've glued the chainplates in and bolted to the subdeck. (Inside the hull) First I keyed the stainless with a grinder and put rivets through the C/P holes as extra keys. I know there are probably people looking at this thinking "That's going to pull out without bolts through the hull."

The truth is the bolts only go through the hullsides which are only a few layers of cloth anyway. The rivets will help with load but I don't think they are necessary. I reckon the epoxy will do the job. (Those who doubt should try and get the spills off the garage floor.)

This will result in the chainplates being hidden like the bridle chainplates. Nothing on the outside of the hulls.

Decks, Wested and ready to go on.

I think in a way, I represent different type of sailor.

This is an old boat that I am restoring and it will never be as fast as the newest olympic boats.

Still, it will be a strong, reliable boat and it will go as fast as I'm capable of making a Tornado go.

Other guys are doing the same thing with Flying Dutchmen and various classic sailing classes.

There is something, I don't know if romantic is the right term, but definitley an appeal in giving new life to these classic racing boats.

Wednesday, March 19, 2008

Bolt Up Part Two

Well the boat is back in the living room for fitting of the front beam.

All bolted up and aligned.

With this one I am glassing up the beam box in situ as I have used the original bolt anchors. They were solid and with the front beam the bulkhead is secured to the two subdecks all of which is secure.

I'll hopefully get the glassing done tomorrow and will maybe have the hulls decked over Easter. (Must write a list in case there is anything that needs doing before the decks go on)


Beam bolted down without beam boxes.


This is how the tiller moulds turned out. They are rigid but still flex enough to pop off tillers easily.


Saturday, March 15, 2008

Rudders

As some viewers have seen through my poor attempt at finding content when I haven't actually done anything much.....


I disassembled the rudder stocks to find they are in too poor a state to save.
Kind of OK in a way as I get to play around and build some carbon ones.


I really like my old aluminium tilers so I made moulds off them to make a new set.


First I sanded them (Where the bend is was a weld that needed to be removed) then covered them with packing tape as a release agent.


Then they were covered with five layers of 6oz cloth and taped over with duct tape.


The reason for the duct tape is that the 6oz cloth is reluctant to take the 90 degree turns.


I will pop the moulds off tomorrow and start setting up the vacuum system.


The real good news is that the front beam is being dropped off on Monday so we should really get moving on finishing the hulls.


The self tacking track has been ordered from Ronstan and should arrive next week. The track is 1100mm long, at a radius of 2150mm, black anodised, undrilled.

Price AU$190.

Tuesday, March 11, 2008

The Archives

I've been disassembling the rudder stocks and the boom ready to go off to the anodiser.

Also, spoke to Andy tonight and the delivery of the front beam is imminent.

While going through some photos I came across these oldies.


My first boat, a Manly Junior, circa 1973


This is my Mosquito, not sure when but during the 80's.


Phantom being built (by my father), I was way too light for it. Circa early 80's


Sailing off Kiama, Sth coast NSW, probably around '85 or '86.

Nacra 5.2

This was taken before the start of the 1978 around the lake race (Illawarra). The Cobra, Jaldi Jaldi, belonged to a guy named Pat Quin who I crewed for a couple of times. Pat Was a really hot sailor which is probably why we won the race. Jaldi was a beautiful boat which I think Pat built.


Oh. And here's me in my first car.

Not sure when but it was a while ago.

Sunday, March 9, 2008

A computer, an internet connection, a camera.


I have never been a big fan of blogging for bloggings sake.

You know."Woke up, ate toast for breakfast, ran into Doug........".

But if you are doing something that interests you chances are there is someone else somewhere also interested to see it.

Yellowtaxi is basically about a boat.

With nothing more than the things I already had (Computer, camera, internet access) I am able to publish a documentary (OK so it may be a little raw) that is able to be viewed and commented upon by people with similar interests all over the world. (Don't know how many places Google is available in but this blog gets visits from 36 countries)

And all for free.

If you stop and think about it this is a huge concept. The WWW has got to be the biggest thing since the industrial revolution.

Anyway....

The trouble with a blog about building (or rebuilding) a boat is that you can spend days doing uninteresting little jobs that are not really note worthy or worth capturing on film.

Yellowtaxi is just coming to the end of one of those periods so things should pick up soon.


16 Foot Skiff Illawarra Yacht Club

Saturday, March 8, 2008

Catching up on the little things.

Starboard hull just about ready now and I've finally got in and sorted out the area at the rear of the centreboard case.

Taking photos of this spot was as difficult as the actual job.

After removing the cracked resin at the keel around the rear of the case it became clear that the cracks were only surface deep. (Good news)

To restore I first poured a little neat epoxy in to penetrate then filled the area with thickened resin. A piece of 75mm tape on top to hold it together and it's almost finished.

I'll be running some neat resin along the length of the case so any cracks I can't see are filled.

The photos may not show the detail real well as it was a very hard spot to shoot properly.

Next job is to stick all my aluminium (excluding the mast) in a pile and get a quote to annodise.

While I'm waiting on the front beam there are some jobs on the mast and trailer to complete as well as cut out the new decks and West System them.

A new mast rotator is on the cards too as well as fittings for self tacking track and a few other things. These things I may make out of carbon as I enjoy moulding stuff like that.


Thursday, March 6, 2008

Dolphin Stiker bent.


Dissassembled the old front beam with thoughts of re-using the dolphin striker strut.

After unbolting everything I was surprised at the lack of corrosion around bolt holes etc.

However, when I removed the strut I found it was bent (to the side, not fore - aft).

The bend has occurred within the beam so it would be very unlikely that you would discover it with a routine inspection.

Work continuing on the starboard hull and still waiting for the front beam.

I am going to keep the old rudder stocks as they are light, strong and in good condition. They will recieve a bit of a pimp up, probably re- annodising, and should come out ok.

On a slightly different topic:

Many years ago (somewhere around the late eighties) I used to sail a Nacra 5.2 in the ocean off Kiama, on the south coast of NSW.

There was a bit of an informal club there and we would rig on the little protected beach opposite the boat harbour.

I'm pretty sure there was some guys doing the same thing on the central coast or maybe Forster at the time.

What I have noticed lately is the difficulty in gaining access to the shore to rig and launch a boat. I'm not talking so much about surf beaches, more the little protected bays where you could safely launch from to gain access to open water.

It seems these days councils have more and more fences up to prevent this sort of thing.

Sunday, March 2, 2008

A little Progress

Continued to bring the starboard hull up to speed and also went about fitting the tramp track to the port hull.

The track goes underneath the deck after routing an apropriate amount out of the stringer so it is flush.
I have used this method on two previous boats with no problems and it gives a nice clean deck.

Then..... this afternoon I went up to the harbour and watched the 12ft skiffs race. I took a few photos of their rigs, mainly concentrating on their big head mains.
Soon I will have a seperate page with a lot of rig info and pics that I am slowly gathering.

It was a beautiful day on the harbour and I wished I was sailing. Oh well, soon.
The worlds are over so I should get my front beam soon.

Tramp track recessed into stringer. Deck to go on top.


Big Head 12s


The old and the new.

Saturday, March 1, 2008

Checking the Cases

From a readers point of view it may seem as if not much has been happening with Yellow Taxi.
The truth is I am bringing the starboard hull up to the same stage as the port and I saw no point in duplicating posts of what was essentially the same thing.
What I have been doing tonight is checking around the bottom of the CB cases.
I have already had a quick look but I thought I would be a bit more thorough.
The following rather unflattering(is my hair really that thin??) pics show me with a video camera taped to a batten so I can get under the lower subdeck and have a close look.
The builder has surrounded the cases in a fillet of resin.
Port hull is sound.
Starboard hull has large cracks around the aft end of the case.(This is good because it is easy to access.If the cracks were in the middle I would have had a real problem.)
So the next step is to reach in with a Dremel and grind the resin out.
Then I will replace the fillet with epoxy.

And, isvflorin, yeah having the boat in he living room is cool. You can watch TV while you are working.

Video camera taped to a stick.


Me going bald!